How to Draw an Art Paint Palette Small Hands Border
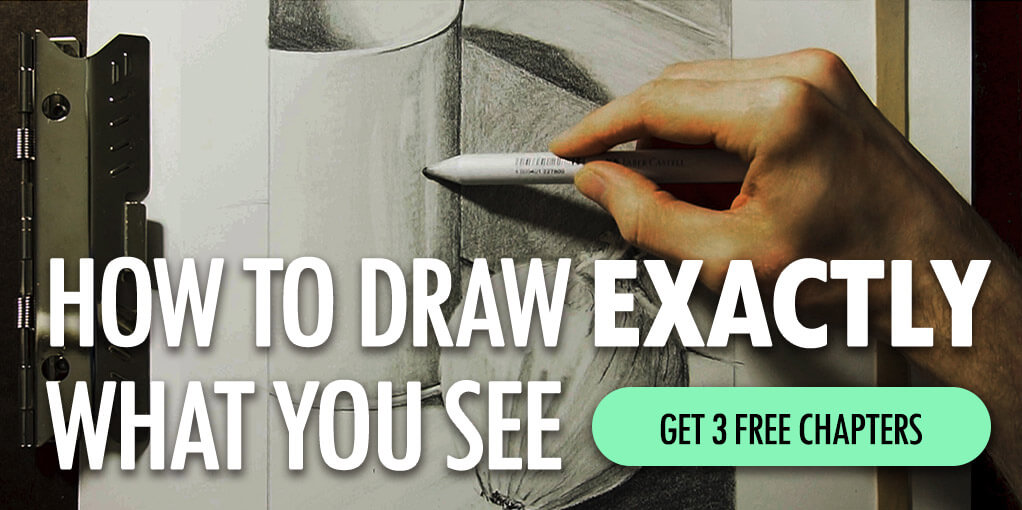
This article contains footstep-by-footstep images of the process I use to create realistic looking drawings, as well as tips I've picked up over the years which anyone tin apply to improve their drawing skills. It's essentially a quick version of our 55+ folio drawing class, How to Draw EXACTLY What Yous Run across.
There's a lot to cover, and then let's become started!
Quick announcement - EmptyEasel has created a quicker, easier way for artists to have their own art website. Click hither to larn more and get a simple art website of your own!
one. Make sure there's a direct light source.
Earlier I started on the drawing for this tutorial, the showtime thing I did was set up a lamp pointing at my nonetheless life from just a few feet away. I also turned off all the other lights in the room to increase contrast and clarify each shadow.
It's extremely important to make good lighting for yourself when you're drawing indoors. If you don't accept that potent directional lite, y'all won't be able to come across the shadows and highlights and your cartoon volition near likely turn out grey and visually flat.
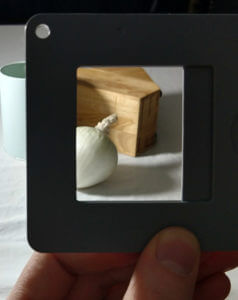
2. Use a viewfinder to set upwards your composition.
 This is the all-time way I've found to start a drawing, and information technology's pretty like shooting fish in a barrel too. All you need to practise is cut a rectangle out of a slice of cardboard (similar a shoebox chapeau) and utilise information technology to visually crop your subject.
Store-bought viewfinders work too—hither are several from Blick if you want something a bit sturdier and longer-lasting. I'k just cheap. :)
Motility the viewfinder around until y'all've found the best limerick possible and record it in place. Then draw the same size of rectangle on your paper.
When yous await through the viewfinder, everything within the frame is what y'all'll describe, and you tin can ignore the rest. Non only volition information technology improve your compositions, but it will besides help with the adjacent few steps in the cartoon process.
Terminal on this betoken, here is another example of a viewfinder pulled directly from our grade How to Draw Exactly What You lot See
If you don't have i, I highly suggest picking one upwards. Y'all can become the i in the photo at this DickBlick link.
3. Start drawing objects that intersect the border.
Always brainstorm drawings forth the edges first, before you practise anything else. This will "anchor" your cartoon in identify and go along you from running out of space later on on.
 To make sure I'chiliad starting in the right place, I usually make piffling marks halfway along each edge of my drawing, and then in the same place on the cardboard viewfinder.
You tin't encounter those marks on the viewfinder above, but on the paper to the left I've put ruby-red arrows to show where they are.
These marks give me smaller distances to measure betwixt when I'g staring at my blank paper trying to effigy out where forth the edges I should begin.
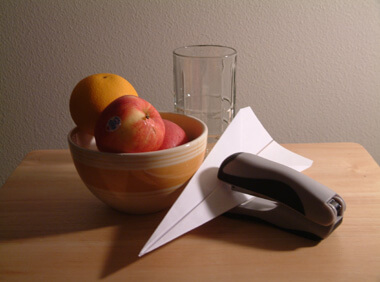
 For instance, the starting time line I made was the curved line on the left side of the rectangle. I looked through the viewfinder and took note of the spot where the outline of the orange crossed the border of the edge. It was just slightly below the halfway point between one of my marks and the top.
If I hadn't had that marking, it would have been a lot harder to decide exactly where to draw the line.
(This idea is similar to using a grid, except there aren't whatsoever lines running beyond the picture.)
four. Check line angles with your pencil.
 I wanted to make sure that the two diagonal lines at the bottom of my drawing were correct, and then I matched my pencil to the angles that I saw in the withal life, and then moved my mitt (while keeping the pencil at the same angle) in front of my newspaper and made certain the angles that I drew lined up.
This is a great way to get correct perspective lines, edges of buildings, or annihilation, really. No matter what I'm cartoon this technique oft comes in handy. Just make sure that you don't subconsciously change the angle of your pencil to match your cartoon.
five. Piece of work around each edge and and then motion inward.
 In one case my drawing was "anchored," I worked my way towards the center, extending all of my original lines until they connected with each other.
While you do this, you'll generally desire to keep moving all effectually the newspaper and so that whole cartoon progresses evenly. At this point in the cartoon you should merely be putting downwards the main outlines—no details or shading!
Describe lightly too. When you get to tip #9 you lot'll see why it's a good idea.
six. Draw the negative infinite around the objects.
 This tip I learned from Drawing on the Correct Side of the Brain
 past Betty Edwards. It's stuck with me through the years and I apply information technology every time I depict.
What yous do is, instead of trying to draw a bowl or fruit, depict the negative shapes between objects instead. Does that brand sense?
The problem with just thinking "draw that orange," is that your mind will bring up not-visual ideas about oranges instead of letting yous focus on the specific shapes in forepart of you.
seven. Close one eye to flatten out the paradigm.
I e'er squint with 1 heart when I draw, and I'1000 sure many of you exercise besides. This helps because it eliminates depth perception and makes the subject you're drawing appear apartment. Be consistent in which eye you employ, though; if you switch eyes you'll see the objects move slightly, which can mess you upwardly.
8. Look back and forth as frequently as possible.
 Spending too much fourth dimension looking at your paper—instead of your subject—won't work, and it's like shooting fish in a barrel to understand why. If your eyes are ever on your paper, y'all won't ever be seeing what you're supposed to exist cartoon.
So when yous draw or paint, picture your eyes dorsum and along and never let them balance for too long in ane place.
With do, your optics volition do this naturally, but it's of import if you're just starting out to practise it purposefully at first to build up the habit.
9. Erase when you run across something wrong.
Don't but leave your mistakes there—fix them! If you can run across a problem early on, your finished drawing will accept it too. Past then you won't want to go all the way back and alter everything, so go information technology correct before you're too far in.
What a lot of people don't understand is that the near of import partof any cartoon is the initial line drawing. So ever erase if you need to, considering one time y'all've got a adept line drawing, you lot're abode free.
10. Shade from darkest to lightest.

In one case the line drawing is washed, start filling in the darkest shadows starting time. Remember to expect for areas of reflected low-cal on the shadow sides of objects. Most everything reflects lite at to the lowest degree a little fleck, and leaving those areas lighter will make your drawings much more 3-dimensional. Subsequently your dark shadows are washed, begin to work on the lighter tones all the way upwards to white.
11. Include a full range of values.
 At this indicate I was nearing the terminate of my drawing, so I wanted to brand sure that the darkest shadow area was pure black, and the brightest highlight was white.
Having a total range of values in a drawing looks more natural, since it'south how we see in real life and it's is easy enough to exercise by just adding more darks or using an eraser to pull out more highlights.
And even if there don't seem to be pure black or pure white areas in existent life, lie but a little scrap and add them in anyway; your final drawing will look better.
12. Accept a suspension earlier finishing.
When the drawing is nigh finished, I ordinarily take a sabbatical, walk effectually, and so come back to stop it.
Later on being away for a while, you'll be able see if at that place are mistakes or places that should be completed but somehow got disregarded. Fix those, and at the aforementioned time use your eraser to selection out the brightest highlights in your drawing.

And there'southward the finished piece. I hope y'all enjoyed this tutorial; it was fun for me to but utilise my good drawing pencils for a alter, instead of my normal oil paints.
For stride-past-stride drawing instructions explaining how to practice everything mentioned above, make sure to download our total drawing course, How to Draw EXACTLY What You See. Click the link to learn more or download today!
![]()
NOTE: Y'all may also be interested in EE's footstep-by-step drawing guide for artists. Click below to learn more than!
This post may incorporate affiliate links.
0 Response to "How to Draw an Art Paint Palette Small Hands Border"
Post a Comment